Mfr Part # PIM708
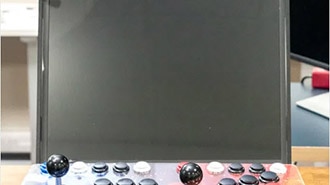
PICADE MAX
Pimoroni Ltd
License: See Original Project Raspberry Pi SBC
Courtesy of Pimoroni
Guide by Pimoroni
This tutorial will help you assemble Picade Max. This is a bit of a mammoth guide, so we'll be splitting it into several parts.
Part 1 <- you are here
What you'll need
ESSENTIAL
A Picade Max kit!
You'll also need the following:
A Raspberry Pi 5. If you want to use an older Pi with this kit that's also possible (as long as it is one of the ones with a 40 pin header).
A microSD card
NICE TO HAVE
An Active Cooler to keep your Pi nice and cool.
A NVMe Base if you want to add some super-fast solid-state storage.
A USB keyboard for configuring the software / connecting to wifi.
Preparation
It will probably take somewhere between two and four hours to build your Picade Max (the current speedrun record is 1h 59m). It's a big build so we'd encourage you to take your time, enjoy yourself and don't feel like you need to rush through it all in one go. A large space, like a table or floor, with a soft covering is an ideal build space. There's a couple of points where it's useful to have an extra, friendly, pair of hands on standby. You’ll also need a Phillips/crosshead screwdriver and a small flat blade screwdriver (2.5mm or smaller). If you don't have those already, you might want to grab an excellent iFixit driver kit.
Contents of the kit
Here's a complete list of everything included in the box! If you're missing anything, please drop us an email at support@pimoroni.com .
IN THE MAIN BOX
19 black powder coated wooden cabinet panels, labelled A to N
4 acrylic panels (1 and 2 player console panels and two marquee panels - one of these is translucent).
3 pieces of cardboard artwork (1 and 2 player console pieces, and a marquee piece)
Black cardboard screen surround
19" display panel
FIXINGS AND SPEAKERS BOX
15 plastic brackets (for attaching the panels together)
2 3" speakers
A bundle of cable ties for tidying up the wires
Rubber feet
A Picade Max bolt pack containing many black metal screws, nuts, and standoffs (you'll use M2.5, M3, and M4 sizes in this build).
A Diffuser Standoff Kit - this contains some tiny M2 fixings, which you'll only need if you're planning on using a Galactic Unicorn as your marquee.
ELECTRONICS AND GUBBINS BOX
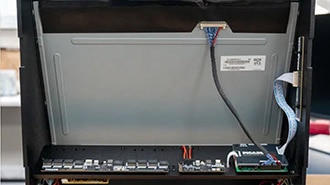
Bag containing Display driver boards (with cables)
Picade Max display driver cover
Picade Max Audio board
Picade Max Controller board
Picade Max Power HAT
9 pin JST-PH cable for connecting the LCD keypad
20cm Qw/ST cable for connecting the Encoder board
Booster header for Power HAT
12V barrel jack power supply
PICO-8 code
Stickers!
BUTTONS AND LOOMS BOX
11 x 24mm arcade buttons
14 X 30mm arcade buttons
Illuminated power button
Picade Max Encoder board
Black dial/knob
Picade Max LCD Keypad board with black keycaps
Keypad Legend (labels for the LCD Keypad board)
Picade Max wiring loom - this includes cables to connect buttons, joysticks, and the power button
JOYSTICKS AND CABLES BOX
2 arcade joysticks
2 joystick balls
2 black plastic collar/dust covers for joysticks
30cm barrel jack to barrel jack cable for connecting the Power HAT to the display driver board
30cm micro-HDMI to HDMI cable for connecting the Pi to the display driver board
2 50cm USB A to C cables for connecting the Audio and Controller boards
Cabinet assembly tips
First up, here's some general rules (more like guidelines, amirite) to keep in mind throughout the build.
The wooden panels are laser cut from MDF by us and then powder coated by a friendly, local Sheffield company. This process can result in some textural variation on the back of the panels, and you might also notice some holes on the inside that don't go all the way through - these holes are where the panels are hung up to be powder coated. There should be an obvious good side and a 'label' side with markings and text on. The label side will always be on the inside of your Picade, so any patchiness on this side won't show once your Picade is assembled.
The wooden panels are labelled A - N so you can identify them easily, and we'll be adding to them to the build in alphabetical order.
Some parts of the cabinet assembly need there to be a bit of give in the cabinet, so it's a good idea not to tighten the screws and nuts that go through the brackets to fasten the wooden panels together fully until the end of the build.
The heads of the screws should always be on the outside of your Picade cabinet, and the nuts/threaded ends of the screws should be on on the inside.
Screw sizes help
There are four sizes of nuts, screws, and spacers in this build, M2, M2.5, M3 and M4. These are all metric bolt sizes, and the number indicates the outer diameter of the screw thread in mm (and the diameter of the hole it will fit through) - so M2 has the smallest diameter and M4 has the largest.
The bags of nuts and bolts are labelled 1 to 6 to help you identify which ones you need for each step (you can thank the Picade Max beta testers for this convenience).
Here is a handy cheat sheet that will help you identify all the screws, nuts and standoffs that are included. A print copy will also be included with your Picade Max!
Attaching the feet to the base
For this section you'll need:
Wooden panel A
Rubber feet
To start, you'll need to find the big black wooden panel marked A - this will become the base of your Picade.
You'll also need the rubber feet. They look like this:
Flip panel A over so the 'good' side without the labels is facing you. Then peel the feet off their backing and stick one near each of the four corners, avoiding the mounting holes.
If you'd like to add more support to the middle of the cabinet or need to account for particularly uneven terrain (hi EMF) you can add more feet, we included extras.
Now the base won't scratch your desk whilst you carry out the rest of the assembly!
Attaching cabinet panel A
Locate the bags of M3 screws and nuts, they should look something like this.
Note that there's two lengths of M3 screws here, 12mm and 18mm. You'll be using the shorter 12mm ones for most of the cabinet assembly, set the longer ones aside until later.
For this section, you'll need:
1x L-shaped plastic bracket
1x M3 12mm screw
1x M3 nut
Use a M3 screw and nut through the centre hole to attach a bracket to the centre of panel A. Note that the single holes in the plastic brackets are quite a tight fit, this may require a bit of determined rotation with your driver.
Attaching cabinet panel B
Next, you'll need:
Wooden panel B
1x L-shaped plastic bracket
3x M3 12mm screw
3x M3 nut
Attach a bracket to it (again using the centre hole).
Use two more screws and nuts to secure panel B to panel A, using the two remaining holes in the first bracket.
Here's what it looks like from the other side.
Attaching cabinet panel C
Next, we'll be attaching panel C to the other long edge of panel A - this will become the front edge of your cabinet. For this part you'll need:
Wooden panel C
2x L-shaped plastic bracket
6x M3 12mm screw
6x M3 nut=
First attach the brackets to panel C, using the central holes:
Then use the remaining holes to attach panel C to panel A. You should now have something like this:
Here it is viewed from the front.
Attaching side panel D (and speaker)
Now we'll be adding panel D (that's the right-side panel, if you're looking at Picade Max from the front). For this part you'll need:
Wooden panel D
4x L-shaped plastic bracket
1x speaker
9x M3 12mm screw
9x M3 nut
2x M4 screws
2x M4 nuts
(all the chunky M4 nuts and bolts should be in bag 1).
First add four brackets to panel D. Note that with the middle bracket, we're attaching the side of the brackets with two holes first.
Next bolt the speaker over the grille using the M4 nuts and screws, you only need to put bolts through two of the four mounting holes on the speaker. We'd suggest orienting the side where the wires attach towards the front of the cabinet for tidiness of wiring.
Use M3 nuts and screws to attach side panel D to the rest of your cabinet assembly. The wooden tabs should slot together at the front corner to keep everything nice and square.
Attaching side panel E (and speaker)
Next, we'll be assembling the other side panel! You'll need:
Wooden panel E
5x L-shaped plastic bracket
1x speaker
10x M3 12mm screw
10x M3 nut
2x M4 screws
2x M4 nuts
Attach 5 brackets to the inside of panel E as shown.
Then attach the speaker over the grille using the M4 nuts and screws, as we did with the other side panel.
Once that's done, you can attach panel E to the rest of your cabinet. Your cabinet should now look something like this:
Time for a well-earned break! When you're ready, progress to part 2 of our guide.
That's all folks!