Mfr Part # 4500
CLUE NRF52840 EXPRESS
Adafruit Industries LLC
License: See Original Project Programmers
Courtesy of Adafruit
Guide by Jeff Epler
Overview
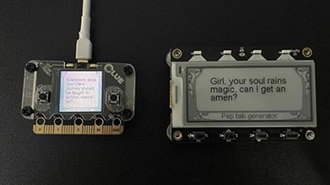
When I saw the "cat" printer in this Hackaday article, I simply had to have one for myself. The original poster made a library for Arduino, but I wanted to make a version that worked on CircuitPython instead.
Before trying this project, please check that your printer works by using the official "iPrint" application, since there's a lot of technology stacks involved
This project is designed for the Adafruit CLUE, but it should be possible to adapt it to other CircuitPython boards that support Bluetooth Low Energy (BLE).
I tried adapting the code to Adafruit Blinka, on a laptop and on a pi4, but the code wasn't as reliable. It tends to just stop printing part way through the image. So, stick with nRF52840-based CircuitPython boards unless you want to debug it!
The CircuitPython code only supports the "Cat" printer model GD02, not the other printers shown in the Hackaday article.
Parts
CircuitPython on CLUE
CircuitPython is a derivative of MicroPython designed to simplify experimentation and education on low-cost microcontrollers. It makes it easier than ever to get prototyping by requiring no upfront desktop software downloads. Simply copy and edit files on the CIRCUITPY flash drive to iterate.
The following instructions will show you how to install CircuitPython. If you've already installed CircuitPython but are looking to update it or reinstall it, the same steps work for that as well!
Set up CircuitPython Quick Start!
Follow this quick step-by-step for super-fast Python power :)
Download the latest version of CircuitPython for CLUE from circuitpython.org
Click the link above to download the latest version of CircuitPython for the CLUE.
Download and save it to your desktop (or wherever is handy).
Plug your CLUE into your computer using a known-good USB cable.
A lot of people end up using charge-only USB cables and it is very frustrating! So, make sure you have a USB cable you know is good for data sync.
Double-click the Reset button on the top (magenta arrow) on your board, and you will see the NeoPixel RGB LED (green arrow) turn green. If it turns red, check the USB cable, try another USB port, etc. Note: The little red LED next to the USB connector will pulse red. That's ok!
If double-clicking doesn't work the first time, try again. Sometimes it can take a few tries to get the rhythm right!
You will see a new disk drive appear called CLUEBOOT.
Drag the adafruit-circuitpython-clue-etc.uf2 file to CLUEBOOT.
The LED will flash. Then, the CLUEBOOT drive will disappear, and a new disk drive called CIRCUITPY will appear.
If this is the first time, you're installing CircuitPython or you're doing a completely fresh install after erasing the filesystem, you will have two files - boot_out.txt, and code.py, and one folder - lib on your CIRCUITPY drive.
If CircuitPython was already installed, the files present before reloading CircuitPython should still be present on your CIRCUITPY drive. Loading CircuitPython will not create new files if there was already a CircuitPython filesystem present.
That's it, you're done! :)
Installing The Code
Once you've finished setting up your Adafruit CLUE with CircuitPython, you can access the code and necessary libraries by downloading the Project Bundle.
To do this, click on the Download Project Bundle button in the window below. It will download as a zipped folder.
# SPDX-FileCopyrightText: 2021 Jeff Epler for Adafruit Industries
#
# SPDX-License-Identifier: MIT

import os

import board
import keypad
import ulab.numpy as np

from adafruit_ble import BLERadio
from adafruit_ble.advertising import Advertisement

from thermalprinter import CatPrinter
from seekablebitmap import imageopen

ble = BLERadio()  # pylint: disable=no-member

buttons = keypad.Keys([board.BUTTON_A, board.BUTTON_B], value_when_pressed=False)

def wait_for_press(kbd):
    """
    Wait for a keypress and return the event
    """
    while True:
        event = kbd.events.get()
        if event and event.pressed:
            return event


def show(s):
    """
    Display a message on the screen
    """
    board.DISPLAY.auto_refresh = False
    print("\n" * 24)
    print(s)
    board.DISPLAY.auto_refresh = True


def show_error(s):
    """
    Display a message on the screen and wait for a button press
    """
    show(s + "\nPress a button to continue")
    wait_for_press(buttons)


def find_cat_printer(radio):
    """
    Connect to the cat printer device using BLE
    """
    while True:
        show("Scanning for GB02 device...")
        for adv in radio.start_scan(Advertisement):
            complete_name = getattr(adv, "complete_name")
            if complete_name is not None:
                print(f"Saw {complete_name}")
            if complete_name == "GB02":
                radio.stop_scan()
                return radio.connect(adv, timeout=10)[CatPrinter]


image_files = [
    i
    for i in os.listdir("/")
    if i.lower().endswith(".pbm") or i.lower().endswith(".bmp")
]
image_files.sort(key=lambda filename: filename.lower())


def select_image():
    i = 0
    while True:
        show(
            f"Select image file\nA: next image\nB: print this image\n\n{image_files[i]}"
        )
        event = wait_for_press(buttons)
        if event.key_number == 0:  # button "A"
            i = (i + 1) % len(image_files)
        if event.key_number == 1:  # button "B"
            return image_files[i]


printer = find_cat_printer(ble)

def main():
    try:
        filename = select_image()

        show(f"Loading {filename}")

        image = imageopen(filename)
        if image.width != 384:
            raise ValueError("Invalid image.  Must be 384 pixels wide")
        if image.bits_per_pixel != 1:
            raise ValueError("Invalid image.  Must be 1 bit per pixel (black & white)")

        invert_image = image.palette and image.palette[0] == 0

        show(f"Printing {filename}")

        for i in range(image.height):
            row_data = image.get_row(i)
            if invert_image:
                row_data = ~np.frombuffer(row_data, dtype=np.uint8)
            printer.print_bitmap_row(row_data)

        # Print blank lines until the paper can be torn off
        for i in range(80):
            printer.print_bitmap_row(b"\0" * 48)

    except Exception as e: # pylint: disable=broad-except
        show_error(str(e))
        image_files.remove(filename)

while True:
    main()
After downloading the Project Bundle, plug your Adafruit CLUE into the computer's USB port. You should see a new flash drive appear in the computer's File Explorer or Finder (depending on your operating system) called CIRCUITPY. Unzip the folder and copy the following items to the CLUE's CIRCUITPY drive.
Several sample images are included, continue on to "Using The Code" to print them. To prepare your own images, visit "Creating Images".
Using The Thermal Printer
Power on the printer (you can tell it's powered on when the blue LED blinks), then power on your CLUE.
The CLUE will wait until it can connect to the printer.
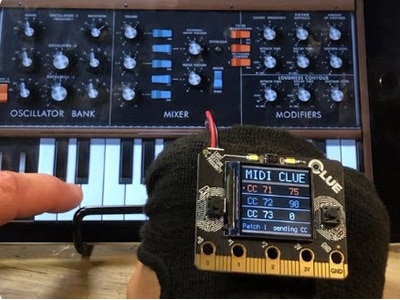
Then, the CLUE's built-in display allows you to choose an image to print. (Just the image name is shown, not the image itself.)
Tap the "A" button to move to the next file in the list. When you reach the end of the list, you'll be sent back to the first file.
Tap the "B" button to send the selected file to the printer. While the print is in progress, button presses are ignored.
When the image is done printing, the CLUE will return to the screen where you can select an image to print.
Creating Your Own Images
You need to prepare your images as black & white (also known as 1BPP) files in "bmp" or "pbm" format. The width must be exactly 384 pixels, while the height can be unlimited (as long as the file fits on the CLUE CIRCUITPY drive).
Different image and photo editing programs have different steps to prepare an image. Here you can see how to use the free and open source GIMP photo editing software to prepare an image, but you should be able to use any software that can write compatible "bmp" files!
Open your original image.
Resize the image to be 384 pixels wide. Let your image editor calculate the height automatically or the image will be distorted.
Convert the image to 1 bit per pixel, using your choice of dithering methods.
Export the image as a "bmp" file on the CIRCUITPY drive. Your CLUE will automatically reset, and you can choose the newly uploaded file for printing!